Prime
Farmers to learn tested practices at farm clinic
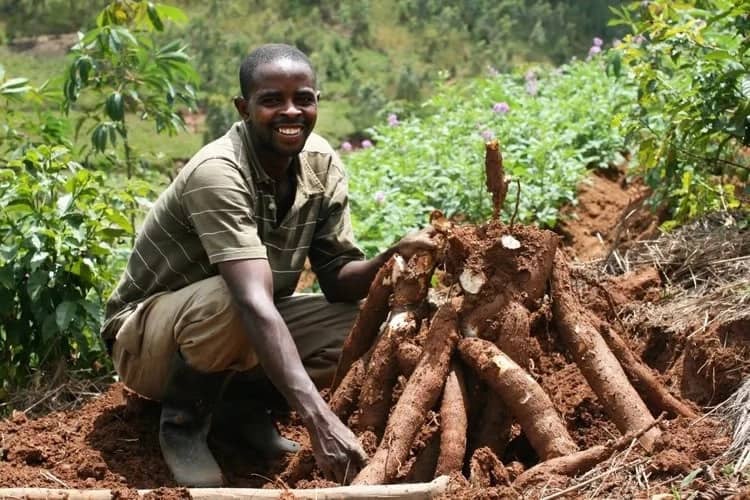
A farmer displays some of his cassava after harvesting. PHOTO/FILE
What you need to know:
- Its theme will be climate-smart farming, with the ongoing effects of climate change, invasion by persistent pests and diseases, and lack of proper agricultural and farming input and information, the farm clinics continue to help the farmers navigate these challenging times.
Nation Media Group – Uganda is set to hold its 36th edition of the Seeds of Gold farm clinic, at National Semi-Arid Resources Research Institute in Serere District today, starting at 8am.
The event is held in partnership with National Agricultural Research Organisation (Naro), Bank of Uganda, Stanbic Bank and Jubilee General Insurance among others.


Its theme will be climate-smart farming, with the ongoing effects of climate change, invasion by persistent pests and diseases, and lack of proper agricultural and farming input and information, the farm clinics continue to help the farmers navigate these challenging times.
Experts
At the farm clinic, experts from the participating organisations will educate, inform, teach and nourish farmers’ hunger and quest for knowledge on cushioning themselves from these conditions that impede on their optimal agricultural productivity, among others.
“This farm clinic comes against the backdrop of a myriad of challenges that farmers contend with. These include crops and livestock diseases and pests such as the fall armyworm and tuta absoluta, and the lethal cassava mosaic, as well as challenges posed by climate changes. These, have made the need for accurate information an urgency, which the farm clinics seek to address to the farmers’ satisfaction,” said Dr David Kalule Okello the groundnut breeder at NaSARRI.
The Seeds of Gold farm clinics have become a forum where experts and farmers meet and share information and the most pressing problems facing the agriculture industry.
Enterprises
Cassava farming
Cassava is similar to other tuber crops like yam and sweet potato. This vegetable is grown mainly for its tubers. The cassava plant is a woody plant with erect stems and spirally arranged simple lobed leaves with petioles (leaf stems) up to 30 cm in length. The plant produces petal-less flowers on a raceme. The edible roots of the plant are usually cylindrical and tapered and are white, brown or reddish in colour. Cassava plants can reach four metres in height.
Land preparation
Cassava can be cultivated under both irrigated and rainfed conditions. Under irrigated conditions, this crop can be cultivated throughout the year.
Planting cassava without prior tillage in degraded soils may produce lower yields in the initial years; once soil health is restored, however, untilled land can produce high yields at a lower cost to the farmer and the farm’s natural resources.
Mulch and cover crops help to reduce weed infestations and create soil conditions that improve yield.
While preparing the land, depending on the soil situation, different methods are followed. In case of light textured soils, flat method; In case of heavy textured soils, mound method is being practiced. In case of irrigated conditions, furrow and ridge methods are being followed.
Planting material
When it comes to planting material, it is recommended to plant disease and insect free plants of 8 to 9 months old having thickness of 2 to 3 cm. In order to make better stakes (stem cuttings) or root yield, stakes obtained from bottom and middle portion of the stem after discarding 1/3rd from the total length of the stem from the top are preferred. Prepare the stakes of smooth and circular cut instead of irregular cut.
When it comes to method of planting in cassava cultivation, vertical, slanted, and horizontal can be practiced.
However, vertical planting is recommended as it results in more uniform formation of callus tissue around the cut surface and this helps in forming the tubers uniformly all around the base of the cassava plant.
Planting one stake per hill is recommended. However, two stakes per hill may increase the yield but reduce the tuber size which may not be good for export market quality.
Manures and fertilisers
For high yielding hybrid or improved varieties, a basal dose of 15 tonnes of farmyard manure (FMY) along with a chemical fertilisers of Nitrogen (N:50kg), Phosphorus (P:50kg) and Potash (P:50kg) per hectare should be applied at the time of land preparation.
Pests and diseases
The following are the common pests and diseases found in cassava cultivation; cassava mosaic, cassava bacterial blight, anthracnose, bud necrosis, brown leaf spot, white leaf spot, cassava brown streak disease, cassava root rot disease, African root and tuber scale, two-spotted spider mite, cassava green spider mite, grasshoppers, cassava scale, root knot nematode and witches’ broom.
Harvesting
The cassava crop is ready after 10 to 12 months of planting and short duration crops may be ready in 6 to 7 months after planting. Harvesting in right time is more important as delay may result in low quality of tubers.
Mostly, cassava is harvested by hand, lifting the lower part of stem and pulling the roots out of the ground, then removing them from the base of the plant by hand. The upper parts of the stems with the leaves should be removed before harvest.
Sorghum
Sorghum (Sorghum bicolor) is the fifth most important cereal crop in the world belongs to the family Poaceae. It will grow up to a height of four metres. The size of the grain ranges from 2-4 mm.
Sorghum roots can grow up to a depth of two metres depending on the soil and water available to the crop.
Besides human consumption, the crop is used as livestock feed and also used in ethanol production.
Land preparation
Sorghum does not require fine tilth. Plough the field once or twice with the help of plough.
Practicing tillage will reduce the weed growth by burying the seeds deep inside and killing the germinating weeds which in turn reduce the cost of weeding.
The seed rate
Plant population decides the growth and final yield of the crop. About three kilogrammes of seed is needed to sow in one acre of land.
The thinning operation should be practiced in directly sown crop.
Fertilisers
Apply between three to four tonnes of farmyard manure during the last ploughing. It is beneficial to apply bio fertiliser to increase the yield and to reduce the cost of the chemical fertiliser. The recommended dose of NPK is 100:150:25 kg per acre.
Harvesting
Crop is ready for harvesting after 65-75 days after sowing depending upon the variety. The crop should be harvested at proper stage to avoid grey mold damage.
Groundnut
Groundnut is perfectly grown in well-drained sandy loam or sandy clay loam soil. Deep well-drained soils with a pH of 6.5-7.0 and high fertility, are ideal for groundnut.
Optimum soil temperature for good germination of groundnut is 30°C. The low temperature at sowing delays germination and increases seed and seedling diseases. A soil test must be done before starting a groundnut farming.
Crop rotation of groundnut
Crop rotation is very important in groundnut farming, this helps in efficient nutrient utilization and reduces soil-borne diseases and nematodes. It also helps to reduce the incidence of weeds. Maize, sorghum, pearl millet or small grain crops can be grown following groundnut.
Application of manures
In Groundnut farming, a balanced fertiliser application, based on soil tests, should provide adequate levels of especially phosphorus, potassium, calcium, sulfur, and magnesium. Nutrient availability depends on soil pH, organic matter content, and rate of release of nutrients from the soil minerals.
Sowing procedure
Groundnut sowing during the rainy season starts with the onset of the rains.
Examine the soil before sowing for optimum moisture content after rainfall or give presowing irrigation to make sure good germination.
At the time of sowing, place the seed at 5-6 cm depth in the soil. Compact the soil around the seed to ensure there is firm contact with soil moisture for rapid and uniform germination.
Use of a seed drill with packing wheels is useful to ensure uniform germination. When sowing manually, make sure that plots in each block are completed by the same person to reduce within-block variation due to uneven sowing caused by human differences.
How to control weeds
Weeds cause much damage to the groundnut crop during the first 45 days of its growth. The most critical period of weed competition is from 3-6 weeks after sowing.
The average yield loss due to weeds is about 30 percent, whereas under poor management yield loss by weeds may be 60 percent.
Therefore, it is advantageous to mechanically and chemically control weeds during the initial six weeks of groundnut growth.
Harvesting
Premature harvesting of groundnut pods lowers the yield, oil percentage, and quality of seeds.
Delay in harvesting after physiological maturity can result in increased Aspergillus flavus infection, and aflatoxin contamination in pods/seeds, and many pods may be left in the soil due to a weakening of pegs.
The Spanish bunch varieties (nondormant types) start germinating if harvesting is delayed. Therefore, it is important to harvest at optimum maturity.


